Sign up for the QMED & MD+DI Daily newsletter.
Jonathan Kendler
August 1, 2008
15 Min Read
.svg?width=850&auto=webp&quality=95&format=jpg&disable=upscale "Animated Videos Guide User Interactions with Complex Medical Devices")
DESIGN
|
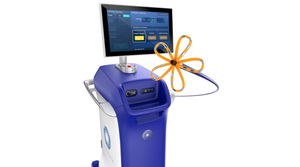
Figure 1. (click to enlarge) The first three frames illustrate how to identify and resolve the cause of a flow obstruction on an infusion pump. The fourth frame illustrates how to install a tubing set on a dialysis machine. |
Imagine you're a nurse in the pediatric intensive care unit (PICU) monitoring an infant on hemodialysis. Abruptly, the hemodialysis machine stops circulating the child's blood and emits a piercing alarm. A quick scan of the machine's screen tells you that it has detected and trapped air in the blood return line to prevent an air embolus. You have a brief window of opportunity to eliminate the air and restart the blood pump before clotting occurs and the entire tubing set needs replacement. Your task is to perform a lengthy sequence of actions, including clamping and unclamping lines, opening and closing valves, suctioning syringes, and pressing buttons to clear the air. Perform a step out of sequence or too slowly and you must start over, or worse, lose a portion of the patient's blood due to clotting. Are you feeling the stress?
Every day, caregivers face similarly stressful scenarios involving interactions with complex medical devices. The scenario du jour might involve one of several devices, such as a multichannel infusion pump, a rapid infuser, or an anesthesia workstation, which typically incorporate a software user interface in addition to specialized hardware. Response strategies vary. Caregivers might respond properly to common events by rote. They might collaborate with a more knowledgeable colleague to resolve less-familiar events. But sometimes, they might take a trial-and-error approach because there is no alternative, possibly placing their patients at risk. The latter strategy is largely avoidable through proper training and the availability of helpful learning tools.
Overcoming Operational Difficulties |
Among the training options, the venerable in-service training session is most beloved by caregivers who prefer to see how to perform a task rather than read about it. Concise, illustrated, and well written quick reference cards are also appreciated and strongly preferred to verbose user manuals written more for clinical engineers and regulators than for end-users. Increasingly, manufacturers are also producing animated videos, a promising medium that can provide a rich training experience similar to in-services but at a lower expense (see the sidebar “Overcoming Operational Difficulties”). The balance of this article focuses on these animated videos, made possible by the increased computing and display capabilities of high-tech medical devices.
The Medium
The term animated video might conjure Disney's cartoon characters, or perhaps Microsoft's much-maligned dancing paperclip that offered assistance to software users. In the world of medical devices, these images can be replaced with more utilitarian visions, such as an animated hemostat clamping on to a blood-filled tube just below an air bubble. The hemostat starring in this video does not have a smiley face. Rather, it looks fairly realistic, and more importantly, provides clear instructions on how to perform one step in a complex procedure.
Animation has significant advantages and a few disadvantages compared with live-action video. Perhaps the most significant advantage is that animations can accentuate important details and actions, avoiding the visual clutter that can diminish a live action video's effectiveness. Animations may include annotative elements, such as arrows to point out special features and indicate direction of motion. Animations can also depict information that is not observable in the real world, such as the cleansing of blood in an artificial kidney, to help users develop accurate mental models of complex concepts.
Animations typically include a voiceover and subtitles to enhance comprehension. While producers might need a voice talent to perform the voiceovers, there is no need for actors—amateur or professional. Using a voiceover makes it convenient to iteratively fine-tune an animation without the need to set up multiple filming sessions. It also makes it easier to update animations many months or years later, even if the original narrator is unavailable and must be replaced. The major disadvantage is that animation can be more expensive than live-action video and arguably requires more-specialized talent.
Animation in Action
|
Figure 1 shows an example of an animation with user instructions.Each frame is intended to teach users how to prevent or overcome an operational problem. Sample animations may be viewed at http://www.devicelink.com/mddi/animations.html.
The Development Process
There's no mystery to the animation development process but it can be a significant amount of work. The five steps are outlined below.
Study User Interactions. Observe end-users performing pertinent tasks and determine where they struggle. Then, ask them to explain sources of confusion and error and how they might be overcome. This kind of work should be done by people accustomed to assessing user interaction quality in an objective manner, such as human factors specialists, but may also be performed by other professionals prepared to set aside their biases.
Talk to Trainers. Ask trainers who deliver in-services or conduct workshops to describe where end-users tend to struggle with a given task, such as clearing air from blood tubes. Also ask them to describe how they help users overcome hurdles, which parts of an interactive sequence require more explanation, and what they tell new users to keep in mind.
Establish Communication Goals. List the lessons you want to teach the animation's viewers, such as where to apply a scissor clamp on a blood tube, or how much pressure to draw using an attached syringe. In the process, consider alternative ways to present potentially complex concepts and procedures in a simple manner. In addition, assess your target audience's understanding of the subject matter and their likely viewing habits. Consider how much time users will have to watch the animation and whether they are likely to watch the animation while they have access to the associated medical device. This information will help you target an appropriate level of content detail and duration for the animation.
Identify an Appropriate Distribution Format. You can distribute your animated videos to users in several ways. The appropriate medium will depend on the target audience's characteristics and their viewing context. Are the users likely to view the animated tutorials at work or at home? Will they view the video while using the product or at another time? The various options include VHS tapes or DVDs, Web-based videos, and device-embedded videos. The trade-offs between these options will be discussed later in this article.
Prepare a Script. Write the passages that will be spoken over the animated scenes. Iteratively review a draft script with key stakeholders and revise it according to their input. For the sake of financial and emotional economy, limit the review process to 1–2 rounds so that the draft script does not become a literary piñata, subject to endless editorial nit-picking. Here are some script-writing tips:
Employ a conversational tone matching that used by a friendly trainer when delivering an in-service to the intended users.
Keep sentences short to make the content easier to follow and potentially more memorable.
Avoid excessively detailed verbal descriptions of information that can be depicted more clearly in the animation.
Include transitional sentences that will give the animation better flow, such as “Now, let's turn our attention to restarting blood flow.” Such transitions will also help draw viewers' attention to critical information.
Presume that 1000 words will translate into approximately 3–5 minutes of animation, depending on the pacing and accompanying visual detail.
Create the Artwork. Choose an appropriate visual style and illustrate a few key scenes. Like the script, iteratively review the illustrations with key stakeholders and revise the visual style according to their input. Then, produce the basic artwork needed to create the full animation, such as illustrations of the entire device from different angles, close-ups of specific components (e.g., tubes, syringes, air bubbles), and perhaps the user's hand-operated controls. Pay close attention to scale so that the artwork fits the intended frame (e.g., a pop-up window displayed on a desktop-size monitor versus an image filling a comparatively small, 320 × 240-pixel display) and has an appearance well suited to the display's resolution. Here are some artistic tips:
To keep things simple looking, limit the total number of illustrated elements (i.e., the visual vocabulary), using compound elements whenever possible rather than developing entirely new ones.
Eliminate extraneous details whenever possible to focus the viewer's attention on salient details.
Accentuate salient visual details by using bold colors and outlines.
Utilize perspectives that provide sufficient visual context, such as an isometric or three-quarter view that can provide a more complete sense of user-product interactions.
Use a limited number of harmonious colors, reserving certain colors for coded purposes (e.g., red for blood, orange for warning messages, green for arrows indicating movement).
Create a Storyboard. To prepare for the creation of the complete animation, produce a series of sketches depicting key scenes. Storyboard sketches can be drawn by hand or by using illustration software such as Adobe Illustrator or even Microsoft PowerPoint. The storyboard shouldn't have the refined visual style of the final animation, but a rough depiction of key steps and animation elements such as movements, transitions, and fades.
Animate. Traditionally, animation production has been a manual and laborious task. Until recently, animators had to spend many hours drawing thousands of individual frames by hand to produce a brief animation. However, computer-based animation tools greatly simplify the animation process, automating the creation of the many frames that produce motion.
Choose an animation software program that can export the finished product in a suitable file format and that is most compatible with your graphics tools. One option is Adobe Flash, a popular animation tool commonly used for creating Web-based animations. Flash is particularly well suited to creating two-dimensional animations, which it can export in many formats. Additional options include 3D Studio for producing three-dimensional animations and Adobe After Effects for producing high-end video that can incorporate advanced special effects. Regardless of the software used, follow these guidelines to ensure effective animation:
Utilize a moderate and consistent pace for the animation that is synchronized with the animation's soundtrack.
Avoid animating more than two or three on-screen elements at once.
Avoid excessively quick (e.g., less than 1 second) motions or transitions, which users might overlook.
Use fades or transitions to create visual breaks between key sections of the animation.
Add Sound. With preliminary animated sequences created, sound can be added to bring the animation to life. While sounds might include a bit of introductory music and various machine-produced clicks and beeps, the primary sound will be the narrator's voice. Here are some tips for voiceovers:
Ask representative users whether they would prefer to listen to a male or female and choose a narrator accordingly.
Choose a narrator whose voice will be pleasing and intelligible to most listeners. Avoid heavily accented voices and voices that are particularly high or low pitched.
Direct the narrator to speak in a conversational rather than formal tone, matching the tone you intended when you wrote the script. Specifically, ensure that narrators include lots of prosody (i.e., inflection) and to avoid speaking in a monotone.
Direct the narrator to speak with a variable pace, speaking faster through basic material and slowing down to present more-complicated material.
Evaluate the Draft Animation. Invite representative users to watch the animation. Then, observe them perform the associated task—perhaps in the context of a usability test—to identify any continuing difficulties that might be resolved by animation revisions. Also, ask the users to critique the animation, citing its strengths and opportunities for improvement. Focusing on the positive, users might identify segments that provide key insights. Focusing on the negative, they might point out segments that are confusing, boring, annoying, or even insulting. Although users' inputs should take precedence in deciding how to revise the animation, also ask the key stakeholders for their feedback on it.
Refine the Animation. Finally, draw upon the users' and stakeholders' inputs to refine the animation, taking care not to drain it of its cinematic power, if you will, or of its overarching style in a misguided effort to accommodate every last criticism of the draft. Remember that the animation will necessarily reflect design trade-offs, just like the medical device it depicts.
Pitfalls to Avoid
Although well made animated tutorials can help clarify complex user interactions, they are not a panacea. A well produced animation cannot compensate for fundamental design flaws in a medical device's user interface. Importantly, like an unclear user manual or an incoherent trainer, a poorly produced animation can mislead users or complicate their interactions with a medical device. Consider the following risks when producing an animation.
Creating Detailed Animations for Overly Simple Tasks. Animations are particularly useful for complex or involved tasks that might be difficult to depict using text alone. Avoid producing detailed animations for tasks that should be self-evident or better explained with a simple textual instruction or graphic.
Excessive Use of Motion. Animations do not need a lot of motion or visual excitement to be effective. Avoid the impulse to include excessive motion graphics and decorations, which can create an overwhelming impression and distract viewers from critical information.
Excessive Visual Detail. As mentioned earlier, one of animations' strongest advantages over live-action video is the ability to utilize simplified illustrations that highlight the most significant interaction elements to viewers. Avoid the use of technical illustrations that depict vitually all of a medical device's details, especially when producing animations for a relatively small display.
Prolonged Duration. Most users generally want medical device instructional materials to provide just enough information for them to perform their job correctly. Provide too much information in an animated video and viewers become distracted and ignore the video's central messages. When possible, avoid producing videos that run longer than five minutes.
Distribution Formats
So far, this article has discussed animations similar to short films, lasting a few minutes. Such animations may be viewed in a medical device's online help system. This approach promises to provide guidance at the place and time when it is needed and is particularly useful for caregivers learning to use a device. However, watching a 3-minute instructional video while treating a patient might not be practical. First, there might not be sufficient time to watch the video while responding to a critical event. Second, a clinician might find it embarrassing to watch a video in front of his or her colleagues because it could suggest lack of preparation. Third, seeking online instruction during treatment might reduce a patient's or visitor's confidence in the clinician. Therefore, users might choose to watch such videos when the associated device is not being used on a patient. Alternatively, the videos might be provided on VHS or DVD so that clinicians can watch them on monitors located in lounges. Streaming video over the Web is another solution.
The problem with streaming video solutions is that clinicians are typically overworked and do not have the free time to watch videos away from the point of care. This reality favors keeping videos fairly short and constructing them so that they operate more like prompts. For example, a dialysis machine could incorporate a series of 15-second animations with discreet, text-based captions rather than audio. Users would have the option to play a series of six, 15-second animations in series instead of watching a continuous three-minute tutorial.
Whether an animation is continuous or segmented, it should give users some control over it. Accordingly, animations should include play, pause, stop, and repeat controls, presuming that the host hardware provides a means to control volume. Segmented animations should give users the ability to navigate among chapters.
Implementation
Perhaps you're convinced at this point that animations are a real asset—worth considering for implementation on an upcoming medical device—and have a better sense for the development process. But, which department should lead the development effort? Design (user interface or industrial), engineering, marketing, documentation, or training? There's no simple answer to this question, noting that departmental capabilities and their interrelationships vary so much among companies. However, for many companies, a multidepartmental, team approach might be most fitting.
The development team will need to address many topics, including:
The animation's file format. Make sure it will be compatible with the computing platform, which might be a version of Windows, Linux/Unix, or another operating system.
The required computing power. Ensure that running the video will not interfere with critical machine functions.
Compatibility between the animation and other training and learning tools.
Potential updates to animation content to reflect software or hardware upgrades.
Translation of the animations' soundtrack and text content to various languages.
Importantly, an embedded animation becomes part of a medical device's user interface. Therefore, it will be subject to the same design validation requirements applied to the device's primary user interface elements (e.g., menu and parameters display screens).1
Conclusion
We've come this far, but no further, before using the expression, “a picture is worth a thousand words.” It's a truism that applies to teaching people to use medical devices, and it applies doubly to moving pictures (i.e., animations). As discussed earlier, clinicians prefer to be shown how to perform tasks, rather than to find and then study a user manual. Animations can be almost as effective as a live teaching session, assuming they are well designed and executed. So, they are becoming more common, at least as DVD-based aids, in the medical domain. Now, the advent of medical devices with powerful computing capabilities has thrown open the door to embedding them in forms appropriate to viewing at the point of care.
Michael Wiklund is founder and president of Wiklund Research & Design Inc. (Concord, MA). Jonathan Kendler is a cofounder and partner at the firm. He can be contacted at [email protected].
References
1. Michael Wiklund, “Usability Testing: Validating User Interface Design,” Medical Device & Diagnostic Industry 29, no. 10 (2007): 78–89.
Copyright ©2008 Medical Device & Diagnostic Industry
About the Author(s)
You May Also Like