Wilson Instruments Gets Rid of Deadweights
OEMs that rigorously manage the quality of their suppliers' products and services stand to benefit from improved supplier performance.
July 1, 2007
Originally Published MPMN July/August 2007
EXHIBITOR PROFILES
Wilson Instruments Gets Rid of Deadweights
|
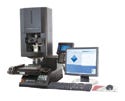
The Tukon tester employs closed-loop control for increased flexibility. |
Conventional hardness-testing equipment may feature six or seven weights in a machine, so users can only apply the force for those weights, according to Ed Tobolski, hardness product manager for Wilson Instruments (Norwood, MA). But Wilson, a provider of hardness-testing systems, has strayed from the conventional. Instead, the company has incorporated closed-loop control into its machines with the intent of increasing flexibility, accuracy, and repeatability.
“With that closed-loop system, you can apply a hundred different forces within the range of the instrument; you just tell it what you want and it'll do it,” Tobolski says. “You have much more flexibility, which becomes important when you're trying to check very hard things or very small things where you want to apply the most force you can to get a good reading, but you're limited because of constraints of the size of the part or the material itself.”
Founded in 1929, Wilson specializes in the development of hardness testers, as well as test blocks and accessories. Since its acquisition in 1993 by materials-testing company Instron, Wilson has focused on integrating closed-loop load-cell technology into its hardness-testing machines. Instron pioneered the use of strain-gauge load cells and the employment of tensile equipment for material-testing applications, according to Tobolski.
“The ability to adjust the loads to suit the application is a nice benefit that we offer,” he says. “And there is the fact that the closed-loop systems are inherently more accurate than the older deadweight ones—they don't have weights and levers and things that can go wrong over time.” Deadweight testing machines can experience force errors resulting from friction and wear, according to Tobolski.
Wilson's Tukon 2100B microindentation tester is one of the company's products that features the closed-loop control system. By placing a load cell between the indenter and drive mechanism, a precision test axis is formed, which can eliminate test result errors caused by test force inaccuracy, according to the company.
Hardness testing entails making extremely small indentations in the material with a diamond and then examining the size of the mark using a microscope. By taking into account the size of the indentation and using mathematical formulas, users can determine the hardness of the sample material.
Metals are the most common materials to undergo hardness testing; however, Tobolski notes that actual bone and tendons, as well as miniature heart valves, have been the subjects of such testing. Hardness testing is also suited for such applications as implantable devices.
“It's important to know the hardness of the surface of some of those implants because [manufacturers] like to have a very hard surface for wear resistance,” Tobolski says. “You can use a microhardness tester to check the hardness of the surface, whether it's a coating or some kind of a treatment on the surface of the metal itself.”
In addition to designing and developing hardness-testing machines, the company also services them since most hardness testers require periodic field calibration.
Copyright ©2007 Medical Product Manufacturing News
You May Also Like


