PART INSPECTION
October 1, 2006
|
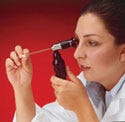
Borescopic visual inspection may be appropriate for small parts with areas not visible to the naked eye. |
Even with all the high-tech testing and inspection techniques in use today, basic visual inspection of medical device parts and components continues to play a crucial role in quality control. That's not to say that advanced technology is not a part of visual inspection. Manufacturers frequently use sophisticated optical systems, such as borescopes, for inspecting mission-critical parts or components.
Borescopes are visual-inspection instruments, akin to medical endoscopes, that enable users to see inside areas of machined, welded, and molded parts. These parts include extrusions, tubing, and other components with areas not visible to the naked eye. Borescopes attach to both portable and fixed-station light sources to properly illuminate the subject area and deliver the best possible image. They can be used directly or can be attached to video systems or digital cameras.
Visual Inspection Imperative
Borescopes offer fast, nondestructive visual inspection to ensure that a part or component is free of contaminants, burrs, cracks, surface-finish irregularities, or other imperfections. Catching such defects before a product leaves the manufacturing floor is obviously important. Burrs, sharp edges, and other defects can be detrimental to a device by contributing to erosion, clogging a crucial part, and preventing it from working properly. That's especially true in devices and components like valves, cannula, catheters, needles, and trocars, which have extremely small openings that can easily become blocked.
For manufacturers, damage to a part or device translates to lost revenue or lost customers. More importantly, such defects could result in improper care of patients. Borescopes are particularly useful in the manufacture of extremely small or complex metal-machined parts, molds, or devices that will be used in medically critical situations. For instance, some borescopes have diameters as small as 0.9 mm, enabling fast and reliable inspection inside tiny openings.
Borescopic inspection of parts and components becomes imperative when certain factors exist, such as
• The area to be inspected is difficult to access. Borescopic inspection probably isn't necessary to inspect, for instance, shallow holes that are easily examined by eye or by using a loupe. But areas like deep bores require borescopic inspection to determine surface finish and other key characteristics. Cross-holes, in which one bore intersects another in such a way that the intersection appears as a hole in the wall of the main bore; or undercuts, a region at the bottom of a blind hole that is larger in diameter than the rest of the hole, also require such scrutiny.
• The part or component is mission critical, such as any device that will come into direct contact with a patient.
• The characteristics of the possible defects—like rust, blockages, and debris—are not well defined as to whether they're acceptable or unacceptable. These defects may be immeasurable or unanticipated. In such situations, an inspector must make subjective judgments based on data collected by a borescope.
Different Scopes for Different Folks
Various types of borescopes play specific roles in visual inspection. These jobs are dictated by the quality issues inherent in the specific manufacturing process that produced the part. There are three common types that are used commonly in device inspection: rigid, flexible, and semirigid.
Rigid borescopes offer the highest resolution and brightest images, and they are more durable and more economical than flexible or semirigid models. These scopes use traditional lens-relay systems to transmit images. The lenses are usually assembled inside a rigid stainless-steel tube. Rigid borescopes are used when the area to be inspected is reachable in a straight path, as in many machined parts, tubing, and some molded parts. If the part can handle a rigid borescope, it may be the best investment.
The quality of the instrument's optics, the F number of the lens system, and the instrument's diameter determine the resolution of rigid borescopes. Available resolutions generally range from 50,000 to 800,000 pixels. For instance, a borescope with a diameter of 1.8 mm resolves approximately 50,000 pixels, while a 4-mm-diam borescope resolves 200,000 pixels. And an 8-mm-diam borescope yields approximately 800,000 pixels. Image brightness is also an important factor in image quality. Brightness is a function of the area that can be seen, so every time the diameter of the borescope doubles, image brightness quadruples.
If the pathway to the inspection area is indirect—through a curved pipe, bent tube, or complex cast, for instance—a manufacturer should opt for a flexible borescope. These scopes employ a fiber-optic image bundle housed inside a flexible sheath. The resolution of a flexible borescope is defined by the number of optical fibers in the instrument's imaging bundle. This number can range from 10,000 to 30,000 pixels. Flexible borescopes, however, do not address all user needs. Because of the fiber optics, the image quality of flexible scopes is inherently inferior to that of rigid borescopes. Also, flexible borescopes can be expensive. They are more fragile and sometimes hard to handle. However, even with these limitations, flexible borescopes offer quality images when the need for flexibility is the most important factor.
Semirigid borescopes can handle the inspection of very small bores, tubes, and catheters. These instruments are often less than 1 mm in diameter and use fiber optics housed inside a very thin, stainless-steel tube. The construction and small diameter gives these borescopes a somewhat flexible nature.
In general, rigid borescopes are the least expensive. They have better resolution, and they are less fragile than flexible and semirigid borescopes. Their need for repair is less frequent and costs less. Prices for rigid borescopes range from around $800 to $5000. Flexible borescopes can cost anywhere from $2500 to $13,000. Prices for semirigid borescopes are in the $2000 to $5000 range.
No Scope Is an Island
|
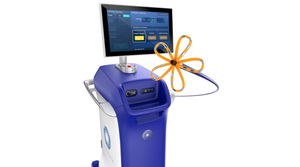
Borescopic accessories, including monitors, light sources, digital cameras, and eyepieces must also be considered to achieve the best inspection results. |
Achieving the best results also depends on the use of borescope accessories. Choosing the correct light source for the application, for example, is critical to achieving the best image inside the test subject. Small portable lights are often adequate for most machined metal parts, but large dark cavities require super-bright metal halide arc lamps.
Accessory options for borescopes include the following:
• Light sources, both fixed and portable.
• Angled eyepieces that clamp on the borescope eyecup, which are used when the inspector can't get close to the borescope's eyecup.
• Digital camera systems for image documentation and distribution.
• Video systems, which allow inspectors to view images on a color monitor or PC screen, record images to a VCR for documentation, or save images to a computer for documentation or e-mail transmission.
• Video documentation software for quality control use.
A video system connected to a borescope enables recording and comparisons, again with the aim of better quality assurance in visual inspections. This is especially important for mission-critical parts and components in an increasingly zero-defect-oriented medical device industry.
Borescope video inspection can
• Document that parts have been inspected to address customer service and record serious liability issues in the event of a part failure.
• Streamline the R&D process by transmitting images to team members for immediate discussion and feedback if, as is often the case in this industry, the design team is located in different locations.
• Provide instantaneous nondestructive quality control and manufacturing feedback on a process, allowing manufacturers to fix problems as soon as they're detected.
|
Flaws and imperfections in small device components, such as burrs (inset), can be detected by the user without destroying the part. |
Specialized software can enable a manufacturer to establish and maintain inspection procedures with references, such as go/no-go images that can be viewed on a PC monitor side-by-side with live video to support ISO 9000 standards. By defining a series of annotated reference images to display along with the live image during inspection of each feature of a part, a manufacturer can
• Classify, capture, and display a series of reference or go/no-go images to compare with live images. Images of problems are simple to capture, annotate, and save to a quality control archive.
• Train new personnel.
• Share images with vendors, customers, regulators, or design and engineering teams.
Other software products allow the capture, manipulation, analysis, storage, and output of still images, video, and data. Manufacturers use such software with a borescope (or microscope) to compute statistics, collect data, capture full-motion video, and create graphs and charts of possible defects. Discrete objects such as particles, grains, and cells can be counted and measured. The types of documentation will, naturally, differ by manufacturer and by part.
Borescopes in Action
For medical device manufacturers, metal machining, welding, casting, molding, and electrical discharge machining (EDM) serve as fundamental manufacturing processes. A vast array of parts manufactured by any one of these processes can be, and often needs to be, inspected with borescopes.
Processing equipment contains welds and welded tubes. Inspectors of welds usually look for weld continuity or strength at a heat-effected zone. Most stainless-steel tubing, such as that used in hypodermic needles, is made through the welded and drawn process. The welded seam must be inspected for smoothness and integrity. Bent tubing can often require the use of flexible borescopes for visual inspection.
For molded parts, manufacturers are often concerned with flash. Molded parts may feature complex shapes that can require flexible borescopes for inspection.
|
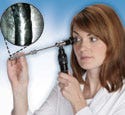
A rigid borescope, as seen here, is best suited for components with straight pathways. The inset shows an image of a metal tube. Rigid borescopes can yield higher quality images than other borescope types. |
Metal machining produces, for example, valves in medical instruments. Problems in this area can include burrs, surface finish irregularities, contaminants, and other defects. For machined parts with straight, shallow holes, a rigid borescope with the shortest possible length is best. Deep, straight bores require a longer rigid scope. A machined area that's not in a direct line of sight requires a flexible borescope for inspection.
EDM is frequently used for parts that have strange geometries or small details that don't lend themselves to normal machining. Visual inspectors of such parts or components are typically looking at the roughness of a surface, that is, how well the material has been melted away by the electron beam. For EDM parts, rigid scopes are often appropriate.
Fluid flow is often a common theme for every process. Medication, plasma, blood, tube-feeding formula—the parts through which any of these vital fluids flow—must be free of contaminants that could restrict the flow or end up in the fluid. The parts also must not have cracks through which fluid could leak.
Inspection Benefits
There are many benefits to using borescopic inspection methods. The most obvious is that the inspection does not require destruction of the part. This is a very important for manufacturers that produce expensive components. Borescopes also enable 100% inspection, as opposed to batch testing. Each component is thoroughly examined, which is required to meet standards for mission-critical parts. Manufacturers want assurance that not one defective part will pass out of their facility. Destructive testing is obviously impossible with such constraints, and other methods require too much time to test every part that comes off a line.
As borescopes become more affordable (under $1000 for certain models), manufacturers can use them more often on the plant floor. The advantage here is time. Manufacturers don't have to stop a production line to inspect a part in the quality lab, nor do they have to return to the floor to stop the line if they detect a problem. Engineers or machine operators can test items right off the line, allowing for faster decisions on how to correct any problems uncovered.
Some testing techniques require trained personnel to operate the equipment and interpret the data. Borescopic inspection is easy to learn and requires minimal training. What inspectors see through a scope is usually easily recognizable, requiring no interpretation or guesswork. However, it is important not to forget the human element necessary for successful borescopic inspection. Inspectors must be able to identify and evaluate quality issues that are hard to pick up even on video. They should be familiar with color, texture, and other qualities of a part or surface.
Other Inspection Techniques
Borescopes aren't the be-all and end-all of inspection techniques, of course. If no open path exists to reach the subject area to be inspected, the insertion of a borescope is obviously not possible. Alternatively, if a part or bore is large enough to be examined with the naked eye, borescopic inspection probably isn't necessary. Some environmental conditions—e.g., a harsh chemical or very hot environment—could negatively affect a borescope's optical system, which would preclude using the instruments.
And it is important to keep in mind that borescopes are, for the most part, visual-inspection tools to find defects; they are not for quantitative testing. Borescopes often have large depths-of-field and wide-angle lenses, so users can focus out from several millimeters to several inches with the subject still in focus. That constantly shifting plane makes it difficult to calibrate a borescope for measurement. Measurement with a borescope can be done under the right conditions, but it's usually not a viable option.
Other inspection techniques that manufacturers can consider are destructive tests including all material tests—mechanical, technologic, or corrosive—that result in the destruction of the test subject. The tests could range from opening a package to destroying a device or part. Mechanical tests to destroy a sample of tubing, for instance, can result in information about characteristics such as tensile strength, yield, elongation, and hardness.
X-ray inspection is a nondestructive technique that reveals the interior details of components with high definition. X-ray instruments and systems use penetrating x-rays or gamma radiation to capture images of the internal structure of a part or finished product. Possible imperfections show up as density changes in the resulting x-ray, in much the same manner as an x-ray can show broken bones. A typical application is soldering inspection.
Eddy-current testing uses the principle of electromagnetism as the basis for conducting examinations to detect flaws in conductive and nonconductive materials. Eddy-current testing can detect very small cracks in or near the surface of the material. It is also useful for making electrical conductivity and coating thickness measurements. In thin materials such as tubing, eddy currents can be used to measure the thickness of the material. This makes eddy current a useful tool for detecting corrosion and other damage that causes a thinning of the material.
Machine vision systems use digital cameras, smart cameras, and image-processing software to perform inspections similar to human inspectors visually inspecting parts to judge the quality of workmanship. Machine vision systems are programmed to perform narrowly defined tasks such as counting objects on a conveyor, reading serial numbers, and searching for surface defects.
Conclusion
Borescopic visual inspection can be an effective quality assurance tool for medical device and component manufacturers. But there are some basic guidelines that will give manufacturers the best results. Use a rigid borescope if possible and a flexible borescope if necessary. Use the largest diameter borescope for the application. Scopes with smaller diameters might fit into a greater number of areas to be tested, but they sacrifice brightness, resolution, and durability.
Absolute resolution depends on the distance from the subject, as well as scope diameter, quality of optics, and field of view. In almost all cases, closer is better. A borescope that is 7 in. long can resolve 10-µm features at an object distance of 2 mm. At a distance of 20 mm, the inspector can resolve only a 100-µm object. Resolution is not the only factor in image quality. Contrast, or image crispness and black and white definition, is a very important part of the quality of the resulting image. Although borescopic inspection can't cover all aspects of product testing, it has a significant function for mission-critical medical devices.
Douglas Kindred is president of Gradient Lens Corp. (Rochester, NY). He can be contacted at [email protected].
Copyright ©2006 Medical Device & Diagnostic Industry
About the Author(s)
You May Also Like


