Sign up for the QMED & MD+DI Daily newsletter.
Developing an automated inspection process eliminates the excessive variability of manually inspected product samples.
May 1, 2000
22 Min Read
.svg?width=850&auto=webp&quality=95&format=jpg&disable=upscale "Increasing Product Yields with Automated Vision Systems")
E. J. Claude and R. M. Carritte
Originally Published May 2000
INSPECTION
Developing an automated inspection process eliminates the excessive variability of manually inspected product samples.
Effective production line inspections verify quality and detect problems that can lower production yields. When the product being manufactured is complex, the attributes to be inspected are more qualitative than quantitative, or the cost to develop an automated system is high, manual inspection processes may often be more effective than automated systems.
On the other hand, a manual process can lead to inconsistencies in the inspection results, particularly when there is a certain amount of acceptable nonuniformity or variability in the finished product or when the process relies on the inspector's judgment and training. In cases where degrees of nonuniformity or flaws are acceptable, the inspector's experience level and training plays an important role in the efficacy of the inspections.
Visual inspection based on judgment and experience can fall victim to habit and conditioning. Inspectors can become conditioned to expect flaws of a certain type or location on the part or product. If the manufacturing process or materials change, unacceptable flaws of a different type can suddenly appear, and, as a result, inspectors may overlook them and fail to reject these products. Conversely, products with acceptable flaws may be rejected merely because the flaws are new and different and are therefore perceived to be unacceptable.
This article describes the development of a computer-based system for automated product inspection and quality control. The system was developed to improve product yields and to eliminate the excessive variability that was observed with a manual inspection process. The five key steps in developing the automated system were to:
Identify the critical characteristics of the product and its possible flaws.
Define the functional, performance, and quality assurance requirements for the inspection system.
Select and integrate the appropriate camera, lens, lighting, and other system components.
Develop software to implement the algorithms used for measurement and decision making.
Validate and test the system to ensure the requirements were satisfied.
In discussing these steps, the article highlights the key technical issues involved, with emphasis on the use of commercial, off-the-shelf components where possible.
THE MANUAL PROCESS
The automated system that was developed replaced a manual inspection process in which an inspector was required to view the product (a drug delivery device) under magnification using a video monitor. The inspector accepted or rejected the product based on a visual comparison of the product's video image with an overlay mask or template that showed the established dimensional tolerances for the product. Using the template, the inspector determined whether or not the product was the appropriate size and whether or not unacceptable flaws were present.
When a change in the fabrication process unexpectedly introduced bubbles or voids into the product, reject rates soared and yields dropped significantly. A review of the event found that most of the rejected product was in fact acceptable. Clearly, changes in the fabrication process warranted an investigation, but the event prompted rethinking of the whole inspection process. Could an automated vision system be developed that would be less sensitive to minor upsets in the fabrication process, provide reliable inspection results, and meet FDA validation requirements for software-based systems? Fortunately, the answer was yes. With good planning, a modest amount of up-front engineering and analysis, and a well-thought-out validation plan, a cost-effective automated vision system was developed using commercially available components. The system improved the inspection process in three ways: It provided reliable and repeatable results, it reduced inspection costs, and it resulted in lower product rejection rates and higher yields.
CRITICAL CHARACTERISTICS AND IMAGE ANALYSIS
Identifying the critical characteristics that need to be inspected (e.g., product dimensions, appropriate labeling, proper assembly and alignment) is fairly straightforward but essential to achieving reliable and meaningful inspection results. The critical characteristics are dictated by the product specifications and by careful observation of the types of flaws that may be by-products of the manufacturing process. The challenge with vision systems is in obtaining measurements of these attributes from an image or set of images. For many types of measurements, commercial vision system software is available with built-in analysis tools for tasks such as reading bar codes and labels, measuring dimensions, counting parts, and inspecting part positioning. However, some applications require the development of custom image analysis algorithms.
The system described in this article was particularly challenging to develop because one of the critical characteristics was the mass of the product located inside the translucent delivery device. In the manual inspection process, the inspector checked the length of the drug product against an overlay and then rotated the device to check 360° around the outside of the product for flaws, including bubbles or voids. Naturally, voids in the drug product reduce its mass, but whether or not the product is acceptable depends on the size and number of voids. The brightness of light passing through a translucent product is a function of the amount of material it passes through, which means that where there are flaws, the transmitted light is brighter. Dark areas with a consistent brightness level represent mass without flaws.
Because of the product's unique characteristics, a product-specific image analysis algorithm had to be developed. First, a large library of about 10,000 images of randomly selected product samples was collected. The samples included product with flaws representing the various types of defects encountered by the inspectors. The weight of each sample was measured and entered into the library database. Approximately half of the samples in the library were set aside for later use in validating the system. The other half were used to try out various bulk analyses and correlate them to the known masses. Using this correlation, image signatures of good and bad product were identified.
Through experimentation, an image analysis algorithm that correlates statistical representations of the image brightness with the mass of the drug product was defined. This allowed the effect of voids to be quantified and the mass of the product to be inferred so that product does not have to be rejected just because a bubble is present.

Figure 1. Typical intensity distribution for acceptable product samples.
For example, Figure 1 shows the distribution of intensity for each pixel in the image of an acceptable product sample. Notice that it has a bell-shaped curve that is slightly skewed left. The drop-off in brighter pixels on the right side of the distribution is a characteristic of good product. Figure 2 shows the pixel intensity distribution of a product that is unacceptable. Notice that the distribution is bimodal. This dual-peak distribution indicates that there are dark spots and bright spots in the image that complement each other. Light passing through flaws is reflected near fracture surfaces or discontinuities, giving a dark shadow that outlines the flaws. This is what creates the bimodal distribution.
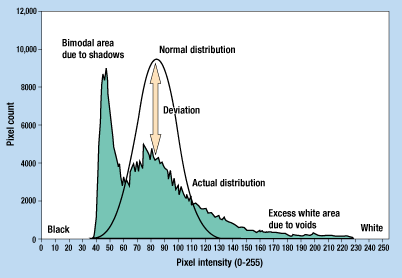
Figure 2. Typical intensity distribution for product with unacceptable flaws.
To improve the accuracy of the inspection algorithm and obtain the best mass measurement, several statistical analyses were performed—each using multiple images taken around the periphery of individual samples. A voting procedure was established in which the results of each statistical analysis were checked in order to accept the product. This procedure was conservatively tuned to reject borderline product in order to increase the reliability of the process, minimize the probability of accepting bad product, and maintain high product quality. Even with this conservatism, the new system recovered much of the yield lost caused by inspector bias.
The critical attributes were identified—including mass—and a method for measuring them and their related flaws was developed. Next, an integrated, computer-based system was needed to automate image acquisition and analysis.
SYSTEM INTEGRATION
The major components of a computer-based vision system include a computer for hardware control, image processing, and operator interface; data acquisition hardware; a camera and lens; lighting; and a product-positioning system. The specific configuration and selection of components is based on the particular requirements of the application.
The requirements for the vision system described here called for a supervised system whereby the operator loads the product, the computer conducts the inspection and makes the accept or reject decision, and the operator transfers the product to the next processing step as appropriate. The system's performance requirements were to accurately reject all product outside the acceptance range, reduce the false-reject rate to an acceptable value, and maintain or increase the inspection rate of 30 parts per minute.
 Full View
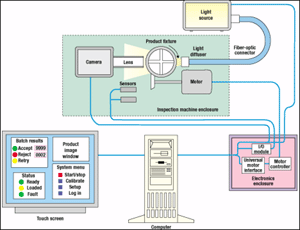
Figure 3. Automated vision system components.
Figure 3 illustrates how the key components were integrated into the system. The process starts when the operator places the product in the fixture. Photoelectric sensors verify that the product is positioned properly and the operator's hand is out of the way, at which time a stepper motor spins the fixture. The rotation is timed such that sequential images of the product are obtained every 45° of rotation. Eight images are acquired and analyzed in just over 1/4 second. The computer evaluates the data, displays an accept or reject indication to the operator, and maintains a count of accepted and rejected product for each batch.
The selection of components for a system such as this is driven by a number of important considerations relating to functionality, performance, and reliability. The rationale used in the selection process is discussed below.
COMPUTER PLATFORM
When choosing a computer platform and operating system, the important issues are compatibility, reliability, and security. For safety-critical applications, a proven real-time operating system like QNX RTOS (QNX Software Systems Ltd.) may be appropriate. For the reliability and security needed in a controlled production environment, UNIX (Sun Microsystems) or Windows NT (Microsoft) may be good solutions. In this case, Windows NT was selected to develop the system because of its high reliability, ability to establish several levels of security, and compatibility with readily available data acquisition software.
When selecting computer hardware, the issues to consider are processor, memory, video, storage, and communications and peripheral interfaces. For demanding video requirements, a graphics accelerator card will relieve the processor of display duties and improve performance. For storage and communication, system developers should carefully consider whether or not their requirements include process data archives or transmittals (e.g., networking). Considering maintenance issues up front is also important in providing a highly reliable system. For example, the use of removable hard drives can simplify system maintenance and downtime. These are very simple to install, lock in with a key, and slide out in a steel case. This way, if the hard drive fails or the manufacturer wants to install an upgrade, a maintenance technician can simply replace the hard drive (fully loaded with all the software) and get the machine back in operation.
Since the computer algorithm developed for the system was computation intensive and computation time needed to be minimized, a 400-MHz Dell dual Pentium with 2-Gb hard disk, 128-Mb RAM, and a graphics accelerator card were selected. The dual processors allowed the use of a dedicated processor for image analysis while motion control, image acquisition, and operating system needs were handled on the main processor.
One of the advantages of a computer-based system is the ability to eliminate hard-wired controls and indicators and use a video display with a mouse or keypad for the operator interface. The operator interface can be further simplified using a touch screen display, such as a Cyber Research flat-panel liquid-crystal display with a touch screen.
DATA ACQUISITION AND CONTROL
Finding the right data acquisition hardware to satisfy the system requirements can be one of the most difficult parts of the design effort. There were three data acquisition and control requirements for the automated system——which were image acquisition, motion control, and input from the photoelectric sensors. Most of the large data acquisition hardware vendors for PC-based systems—including Keithley Metrabyte (Cleveland, OH) and National Instruments (Austin, TX)—supply these components. To simplify system integration and minimize the potential for I/O incompatibility, National Instruments' LabVIEW application development software and its data acquisition and control hardware were chosen.
The system used three computer boards from National Instruments: an 8-bit analog monochrome image acquisition board (IMAQ PCI-1408); a two-axis, closed-loop, stepper-motor control board (PCI-STEP-2CX); and an RS-485 serial board with distributed I/O modules. Also used was a National Instruments universal motor interface in the electronics enclosure to break out the wiring to an Intelligent Motion Systems (Marlborough, CT) Panther-LE motor controller (see Figure 3).
CAMERAS
Selecting the camera type and proper shutter speeds are essential for capturing a quality image for analysis. Cameras use a charge-coupled device (CCD) to electronically collect images. A CCD sensor is a pixel-sized, solid-state photosensitive element that generates and stores an electric charge when it is illuminated. A CCD imager consists of a rectangular array of CCD sensors upon which an image of the scene is focused.
In analog cameras, the sensor usually includes the circuitry that stores and transfers its charge to a shift register, which converts the spatial array of charges in the CCD array into a time-varying video signal. NTSC, PAL, and SECAM are standard video signal formats. Digital cameras digitize the CCD information at the camera rather than at the image acquisition board, providing a high signal-to-noise ratio and better accuracy. Standard digital cameras are available with 10- to 12-bit gray levels of resolution.
Using conventional CCDs to capture images of rapidly moving objects can often result in images that have ghosting or blurring. These CCDs use interlaced scanning across the sensor to capture the image. Interlaced scanning divides the sensor into two fields: the odd field (rows 1,3,5...) and the even field (rows 2,4,6...). Each field is read in 1/60th of a second and then combined to produce the full frame. A blurring problem can occur when the object has moved before the second field is scanned. The "progressive scan" CCD imager solves this problem by scanning the lines sequentially (rows 1,2,3,4...). A Sony XC-7500 analog monochrome progressive-scan camera with a 640 x 480-pixel CCD imager was selected for the system.
System developers should also consider the range of light wavelengths they wish to capture. All matter reflects and absorbs light in different ways at different wavelengths. Sometimes, manufacturers can take advantage of this if they are looking for features that are enhanced at certain wavelengths. In the case being discussed, the product itself was grayish in color. Consequently, color was not identified as a critical characteristic necessary for the analysis, and a monochrome camera was chosen.
Many CCD cameras come with built-in infrared (IR) filters because CCDs are sensitive to a broad range of light wavelengths outside the visible spectrum of 400 to 700 nm. For the automated system, light wavelengths in the infrared spectrum were not useful in the statistical analysis; therefore, the effects of the IR filters were not a concern.
LENS AND IMAGE RESOLUTION
To obtain adequate images, the camera and the lens must be considered together as a system. The lens gathers the light reflected off the object and focuses that light onto the CCD array. Some of the important parameters to consider are:
Field of View. This is the area of the object that is shown on the image. The field of view establishes the magnification achieved. For example, if a field of view of 5 mm is projected onto a CCD sensor that is 10 mm in size, then the magnification is 2x.
Focal Distance. This is the distance from the lens to the object.
Depth of Field. This is the depth of the features on the object that remain in focus or the amount by which the object can move toward or away from the lens and still remain in focus.
F-stop. The f-stop refers to the lens aperture or iris opening. The smaller the f-stop, the larger the aperture, allowing more light into the lens. The f-stop affects both the resolution and the depth of field.
The resolution, or the smallest feature of the object that can be distinguished in the image, depends on the combination of the camera and the lens. Higher resolution is achieved by focusing a smaller area (smaller field of view) onto a greater number of pixels. Most cameras have 640 x 480-pixel CCD imagers, although more-expensive, higher-resolution cameras are available—for example 1008 x 1018-pixel CCDs. A good resource for selecting the appropriate camera and lens for the required resolution is the Edmund Scientific catalog, which provides application notes to assist manufacturers in selecting the right components.
As an example of how to determine the required resolution, consider counting cell colonies in a petri dish that is 75 mm in diameter. If system developers use a lens that projects the whole dish onto a 640 x 480 CCD imager, then they will get a resolution of 480 pixels per 75 mm, or 6.4 pixels per millimeter. In order to resolve cell colonies in that dish, the cell colonies would have to be at least two pixels in diameter, or 0.3 mm.
A microscope lens with a 2- to 8-mm field of view and a fixed focal length of 61 mm was chosen for the inspection system. By experimentation, it was found that setting the field of view to 7 mm was optimal because it produced a resolution of 480 pixels per 7 mm, or 68.6 pixels per millimeter. The magnification at this resolution allowed for the capture of the entire drug product in the field of view while at the same time maintaining high-enough resolution to provide meaningful statistical representations of image brightness. Since the analysis algorithms worked well at this resolution, the cost of a more-expensive, higher-resolution digital camera was avoided.
CAMERA TIMING
Another significant issue for automated inspection systems that capture images of moving parts (e.g., on a conveyor or turntable) is camera timing. The images used for analysis must be timed with the product-positioning system, and the camera shutter speed must be set based on the speed at which the product is moving.
The controlling variable for establishing the timing is the camera frame rate, which is typically 30 frames per second. The image analysis algorithm required eight images equally spaced around the circumference of the product; therefore, eight sequential frames 1/30th of a second apart were acquired as the product was rotated through each 45° arc.
At one revolution in 8/30th of a second (225 rpm), a point on the object moves at about 38 mm per second. With the resolution of 68.6 pixels per millimeter, a speed of 2600 pixels per second was achieved. In order to snap a picture that does not blur due to movement, the shutter has to open and close before a point on the surface of the object moves more than half a pixel. Therefore, a point on the surface of the part can move half a pixel in 1/5200th of a second. Most video cameras provide selectable shutter speeds at discrete intervals: 1/125, 1/250, 1/500, 1/1000, 1/2000, 1/4000, and 1/10,000. For this application, a shutter speed of 1/10,000th of a second was used to freeze the image as the product fixture rotated. This relatively high shutter speed increased the lighting requirements, as discussed below.
LIGHTING
Lighting is an integral component of an image acquisition system, and lighting design depends on the type of object to be imaged and the type of image desired. For the translucent product, backlighting was used. Many other lighting techniques are also available. Diffuse lighting minimizes shadows and glare while ring lighting also reduces shadows and provides uniform illumination. Light-emitting diodes (LEDs) are good if low light intensity is sufficient. Filters can also be used to improve contrast and enhance specific features. Often, some experimentation is needed to establish the optimal system. Resources for selecting lighting equipment include Edmund Scientific, Dolan-Jenner Industries, Fostec Inc., and Stocker & Yale Inc.
Allowing enough light into the camera at a shutter speed of 1/10,000th of a second requires relatively high intensity. System developers may have to prevent heating of the product, which would occur with an incandescent light in close proximity. These problems can be solved with a fiber-optic light source—a halogen light bulb directed at the open end of a fiber-optic cable. The light source itself, and its associated heat load, can be mounted away from the inspection area.
A Dolan-Jenner fiber-optic light source with a 25-pin parallel port connector on the back for control of the light source intensity was used with the system. This proved to be extremely valuable because halogen lamp bulbs—like any other lamp bulb—degrade over time. They typically lose about 5% of initial light output in the first half hour of operation and another 2% over the remaining life of the bulb. Computer control of light levels allows for real-time compensation and adjustment for lamp variability. Using the CCD camera as a closed-loop sensor provided full light-level control at the image acquisition level. Closed-loop control allows for rapid calibration to a known reference at the start of operation, eliminates errors caused by manual intensity settings, and speeds up system recalibration when a lamp is changed.
SOFTWARE CONSIDERATIONS
Integrating the hardware described above provides the capability to acquire an image that can be displayed on a computer screen. Additional application-specific software is needed to control the hardware peripherals, capture the image, analyze the data, and generate the graphical display for the operator.
Development Software. Once system developers have selected their data acquisition components from one of the major vendors, they can use their data acquisition programming language to write custom software that fulfills their system requirements. The system used LabVIEW to develop a user-friendly interface, which allowed the operator to configure, calibrate, and operate the equipment safely. Other software functionality included monitoring safety interlocks, controlling the moving parts of the machine, capturing images, performing image analysis, indicating part status, and logging data for batch records.
Diagnostics. Using the CCD camera, the system was configured to determine when the bulb should be replaced and prompt the operator to replace it, providing step-by-step instructions on the touch screen. To calibrate the system, a calibration "object" that is always in the camera's field of view but away from the inspected part was incorporated into the user interface. The object has known optical qualities and markings on it with known dimensions and orientations. In this way, the light intensity could be checked at any time and the camera orientation and lens magnification could be verified. If at any time these variables were out of specification, the software would either automatically adjust them, or prompt the operator to take appropriate steps to correct them.
Batch Record Tracking. If the development software supports communication protocols or ODBC databases, batch record information can be transmitted to a network or the Internet, or stored in a database. The system included a dynamic link to a database residing on the local hard drive.
SYSTEM VALIDATION
System validation is the process of determining the level of conformance between the functional operation of a system and the system requirements. Validation provides the overall assurance that the system capabilities specified by the system requirements are implemented in the hardware and software and that the system is properly integrated. For the production manager, however, validation can be a painful process if it adds extra time to the introduction of important new equipment.
A process of concurrent validation was employed, which shaved valuable weeks off the delivery schedule for the new system. With this approach, the customer, the engineering team, and the validation team worked together through all phases of the development process. This process was well-defined at the outset, with specific validation steps performed as the design progressed.
With any automated system, one of the most troublesome issues is how to properly validate software. Following a formal, well-documented software development process increases the probability of error detection and removal and thus reduces the overall risks of the validation process. Consequently, FDA requirements for software validation are predicated upon use of accepted software development models. The process used to validate the software for the automated system is based on the Institute of Electrical and Electronics Engineers software life cycle model found in IEEE Standard 1012.
The final validation step involved testing in which the system was challenged with a subset of the 10,000-image library. The samples in the testing library were carefully selected so that a large number of samples were right on the edge of being acceptable. This testing proved that the image analysis algorithms performed as expected. The system was also tested as a whole—with sample product that had known flaws—to make sure the hardware functioned properly.
CONCLUSIONS
When a manual process was used, much of what the inspectors were rejecting was actually acceptable. It was determined that the inspectors were being too conservative because of their perceptions that all good product should appear identical and that all voids were bad. Automating the inspection process made it less sensitive to minor upsets in the fabrication process, provided reliable inspection results, and cut the reject rate in half.
The lessons learned from the development of this inspection system can be applied to the development of automated systems for a variety of other products. While automated machine vision is a well-established technology for many routine types of inspections, innovative image analysis techniques can expand this technology to many other applications. Traditionally, manual inspections for nonuniformity or flaws are subject to inspector perception and can be done more reliably by an automated system if those flaws can be quantified. In addition, with a PC-based system, properly selected off-the-shelf components can be used successfully to provide cost-effective solutions.
BIBLIOGRAPHY
Davies, ER. Machine Vision: Theory, Algorithms, Practicalities, 2nd ed. San Diego: Academic Press, 1997.
Electronic Imaging Resource Guide. Barrington, NJ: Edmund Scientific, 2000.
"IEEE Standard for Software Verification and Validation Plans," IEEE 1012-1986. Piscataway, NJ: Institute of Electrical and Electronics Engineers, 1986.
Inglis, AF and AC Luther. Video Engineering, 2nd ed. New York: McGraw-Hill, 1996.
E. J. Claude and R. M. Carritte have worked on a variety of product development, engineering design, and system integration projects at MPR Associates (Alexandria, VA) for the past 13 years.
Return to the MDDI May table of contents | Return to the MDDI home page
Copyright ©2000 Medical Device & Diagnostic Industry
You May Also Like