Shorten the medical device development process by practicing the four essential steps of virtual concepting.
August 24, 2015
Andreas Pfahnl, ScD and Kirk Schneider
The expedited industrial design methodology coined “rapid virtual concepting” offers a means for faster product development cycles. Virtual concepting fits into a medical device and business development process that consists of four major elements. These elements are flexible and a couple key examples, described below, show the adaptability of these steps. New advanced anatomical models may be instrumental in further developing virtual concepting.
Background
Project managers, program leaders, and business executives developing and managing the development of early stage technologies are challenged with getting project financial approvals and fundraising. This selling process relies on building confidence and excitement in the target audience on the proposed technology. All this is often conveyed through written business plans or investor presentations, and may well go through a prescreening without any opportunity to present the material in-person. There is a strong need to be able to present a realistic vision of the final product at the earliest stages.
Including a captivating vision of what the final product could look like is critical in the business plan and upfront project selling process. This will create excitement and build confidence around the idea, vision and technology!
|
Product developers work under tight development schedules. Developers rely on voice of the customer (VOC) and end user input / feedback during the earliest stages of the development process, including the project selling process. Such information can be obtained through focus groups, end user study sessions, and formative studies. However, developers are challenged with the time it takes to enroll participants in studies, develop the protocols, and coordinate these in-person interactions. Further, it takes time to develop any prototypes refined enough for such studies. Human factors and usability considerations are also an expected part of developing a medical device following ISO 13485 (Medical devices—Quality management systems—Requirements for regulatory purposes), IEC 62366 (Medical devices—Application of usability engineering to medical devices), and ISO 14971 (Medical devices—Application of risk management to medical devices).
Ultimately, the virtual concepting process produces a practical, user-appropriate, aesthetic design at the earliest stages that can be leveraged to secure approval of the full development project.
Once the full development project has been approved, leveraging the virtual concepting process, traditional VOC, user inputs, and aesthetic design validation including physical prototypes of the virtual concept may be employed during the remaining development process.
The 4 Virtual Concepting Steps
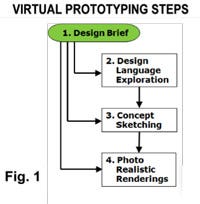
The process outlined provides a way to create a product vision and explore design options using purely electronic tools without in-person interactions. In essence, this is a remote development approach or “tele-industrial design”! The steps outlined and described below are 1) Design Brief, 2) Design language Exploration, 3) Concept Sketching, and 4) Photo Realistic Renderings. The use of the entire process or just specific elements as highlighted in Fig. 1 makes this approach cost effective.
|
The process begins with a design brief to create an understanding of the design direction and requirements. The opportunity then exists to engage the other steps either sequentially or directly. If no brand exists or if the brand is inconsistent among existing products, then defining a design language is critical. From there, concept sketches follow that feed into photo realistic renderings based on CAD models of a specific or select number of concepts. Each of these process elements are elaborated next.
Step #1 Design Brief
The first step is to gather and organize requirements and design input information. A design brief is a great tool to capture the thoughts around key questions; it is simply a short questionnaire. The brief is used to help understand the brand or envisioned brand, and, if there are multiple products, how the brand transcends through the product lines. Questions are formulated around the near-term and long-term vision of the product.
"If no Brand exists or is inconsistent among existing products, then defining a design language is critical."
An understanding of the personality and brands of the market space is established by looking at competitors and any existing products and their brand history. Specific design parameters and criteria are captured as requirements, which look at intended use and functionality of the device, intended emotion or impression the product is to communicate, and any specifics like colors, textures, materials and manufacturing constraints that have been identified as important to convey. The information is used to establish industrial design goals and objectives that identify the desired influence and impact on the target audience.
Step #2 Design Language Exploration
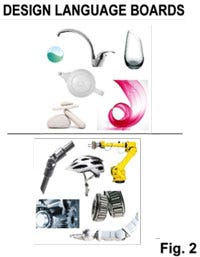
In cases where there is not a product brand or the personality of the product is not defined, a design language must be created to address these aspects. This is done by compiling a wide range of images and organizing ones that evoke similar emotions and feelings onto individual boards called design language style boards. From a product perspective these like images explore colors, textures, shapes, forms and sizes. Fig. 2 shows two specific examples of design language style boards. Each style board focuses on a specific theme. In Fig. 2, the top is “feminine” and the bottom is “robotic.”
|
Step #3 Concept Sketching
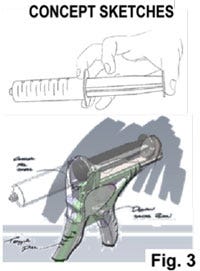
Based on the technology, design brief and design language boards, concept sketches are then created. This is an iterative ideation process made efficient by the use of a state-of-the-art digital freehand sketch pad that allows for quick layering, erasing, and modifications. These are generally 2D black-and-white line-based sketches. They show form, shape, lines, surface, and other aesthetic details. Anatomic aspects may be included as well. Guidelines around human factor-related design parameters including anthropometric data can be leveraged to develop a design and concept (e.g. ANSI/AAMI HE75:2013 Human factors engineering—Design of medical devices; The Measure of Man and Woman: Human Factors in Design, Revised Edition by Alvin R. Tilley and Henry Dreyfuss Associates, Wiley, December 2001). In the inset examples in Fig. 3, the one on the right is a sketch of a hand piece enclosure that is overlaid on a prototype mechanism Computer Aided Design (CAD) model. The electronic sketching is a critical and highly flexible tool that interfaces seamlessly with all different images or starting points.
Step #4 Photo Realistic Rendering
From the sketches, developers can select a specific concept that should be translated into a three-dimensional CAD model. The CAD models and assemblies are constructed to follow the profile and shapes of the sketched concepts. These CAD models are simplified and not yet intended to represent manufacturing enabled components. Rapid 3D-printed prototypes of these models can be made to create “looks like/feels like” models that provide additional opportunities for refining the concept sketches and CAD models, since what you see on the computer screen inevitably never quite feels or looks the same when it’s in your hands! The inset Fig. 4 gives examples of photo-realistic renderings of the previous hand piece, and a detailed orthopedic instrument and kit.


.jpg?width=700&auto=webp&quality=80&disable=upscale)
Photo-realistic renderings of detailed orthopedic instruments and concept models of a hand piece.
The CAD tools integrate with rendering packages allowing the creation of these appearance models, and the ability to explore and select colors, textures, and materials, including incorporation of product graphics. Care must be taken to avoid creating models of embodiments that are not able to be manufactured, as the details are not yet always fleshed out.
Putting It All Together
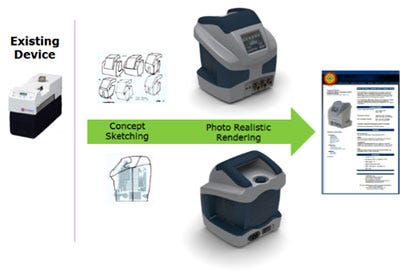
Here are a couple case studies that illustrate how the virtual prototyping design process was used, and the resulting final product. First is the VascuTherm 4 product from ThermoTek, Inc. in Houston, TX. As shown at right, the existing thermal compression therapy products were based on rectangular enclosures. The new product had to be “head turning” and follow a prescribed design language.
The two elements used were concept sketching and photo-realistic renderings. The sketches were guided by the understood core component integration, and requirements around the display position and orientation, and an integrated handle.
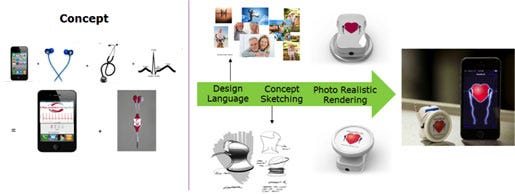
The second example is a product called HeartBuds, shown below. The starting point was a concept of integrating earbuds with an acoustic microphone to simultaneously display, listen, and record sounds using a smartphone application.
Design language exploration provided guidance for the overall packaging, color palette and graphics. Concept sketching and photorealistic rendering gave the ability to envision the final product, in addition to considering key user interactions and refinement of related design features.
Future in Virtual Prototyping
Rapid development of a medical product can benefit significantly from virtual concepting because it allows one to envision the product before the first prototypes are fabricated. It helps allow solicitation of marketing and user feedback early in the design development. Virtual concepting will improve by integrating the concepts into human anatomy models, incorporating tactile feedback and making them dynamic. Anatomic models exist that can be shown with devices, such as those from Zygote and CREST, but they are static. The human anatomy is being mapped and incorporated into virtual reality tools such as those developed at the University of Minnesota Medical Devices Center and the Interactive Virtualization Lab. However, the computing resources to operate these systems can limit the accessibility to such systems.
Enhance your medtech knowledge by attending MEDevice San Diego, September 1–2, 2015, in San Diego. |
Andreas Pfahnl, ScD (GM & CTO) is general manager and chief technology officer of Devicix, an international contract medical device product development and commercialization company in Minnesota. Devicix is a division of Nortech Systems Inc. Dr. Pfahnl holds doctoral and masters degrees from MIT and a bachelor's degree from Rensselaer with studies at the ETH-Z.
Kirk Schneider is an industrial designer with Devicix and holds a bachelor of science degree in industrial design from the University of Wisconsin.
[Images courtesy of KROMKRATHOG/FREEDIGITALPHOTOS.NET, THERMOTEK, INC., AND HEARTBUDS]
You May Also Like
